User content is not official advice; where it conflicts with official documents, the official documents prevail.Safety & Use Guidelines ›

© 2026 AWithZ
User content: this build is the creator's personal experience and has not been verified by AWithZ. Don't copy the settings or methods directly — start at a low level and test on scrap.Safety & Use Guidelines ›

A home-made jump starter from 18650 cells — only 2C cells, picked up for ¥20-odd on the Douyin store; DIY car emergency power, built into a bought Bluetooth-speaker shell
Doomsday LabFollow
Power banks›DIY›U3加强版· BeginnerReport
Adaptive · 1080 / 720 / 480Auto subtitlesPlayback info 03:36
Welding Recipeno level stated on camera
ModelU3pro00:01Same welder as the previous episode
MaterialNickel strip, three layers of tabs stacked at the welds00:16
Cell18650
Cell modelAbout 2500mAh, 2C (creator’s own words)
Cell count12 cells3P4S from the previous episode
Series4 S00:30
Parallel3 P
Voltage14.5 V01:49Reading after wiring the board
BMS4S BMS + balance board (charging goes through the board, discharge doesn’t)01:49
USB output is a slow charge02:03
No heat-shrink; electrical tape used instead03:01

Creator’s own settings as stated in the video (timestamps link to the moment). Not official values — test on scrap first.

Released 2025-06-10DIYLevel Beginnerdigest confidence 0.85

Bill of materials

Welder, accessories, consumables and parts used in this build; quantities and specs are editable Download BOM
AWithZ official
U3加强版 spot welder
×
¥259.9–299.9
WP120 Smart Pen (8 AWG)
×
¥39.9
Nickel-plated steel strip
×
from ¥5.9
Third-party partsFrom the creator’s parts list, grouped by category; links to third-party stores
3P4S pack (previous episode)Other parts · Main body
×
Third-party
4S BMS + balance boardBMS · Charge protection and balancing
×
Third-party
Red / yellow sleeves, foam padsOther parts · Marking and fixing
×
Third-party
Thick wire (main + / −)Other parts · A size up from stock · High current
×
Third-party
Electrical tapeGlue / tape · Insulation and bundling
×
Third-party
Speaker-shell panel (switch / lamp / USB / Type-C)Switches · Shell functions
×
Third-party

Description

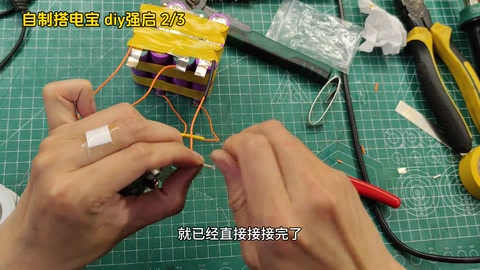
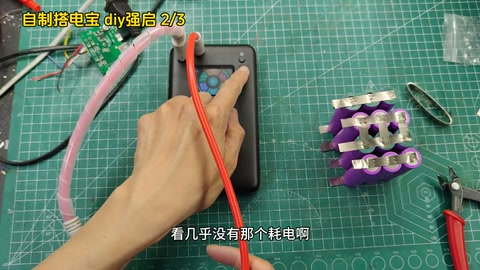
Jump starter, part 2: three layers of nickel tabs welded with almost no charge used; 4S BMS + balance board wired (main +, +1, +2, +4, main −), charges at 14.5V, panel shows full, USB is a slow charge, Type-C charging works; main + / − leads swapped for thicker wire, bundled and insulated with electrical tape, back into the shell

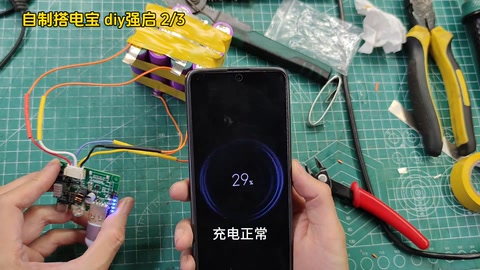
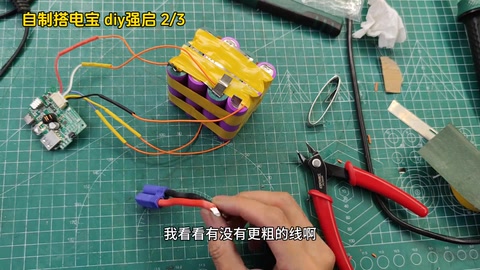
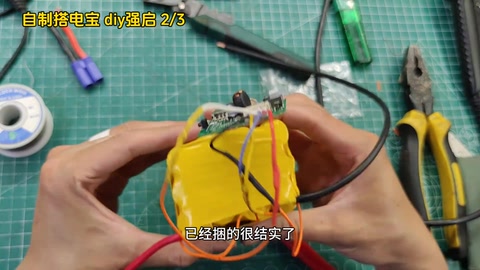
The whole pack is welded up, with three layers of tabs on top — very solid; the charge level has barely dropped, so it should weld a lot of packs — very handy. Wiring the BMS: main + goes to +1, +2, +4 and main −; the leads are short, so extend them; red sleeve on the main +, yellow on the rest, foam pads for a first fix; trim any sharp protrusions; fix the pack first, then wire it, or it’s hard to secure afterwards. With the BMS and balance board connected it charges at 14.5V from a low-voltage supply; press the switch and it shows full, the lamp is quite bright; USB charges a phone at 29% — works, but a very slow trickle; Type-C charging shows normal, the last lamp blinking means not quite full. The main + and − ‘thick’ leads aren’t actually thick, so they’re swapped for wire a good size up from stock. With all the main leads connected and tidied, no heat-shrink to hand, so it’s bundled with electrical tape, two turns over each contact point; it fits back into the original shell exactly, with extra insulation on the main + to prevent shorts. Comments: a car draws 200–600A to start, 3P 18650 gives 60–90A at most, and with enough current the nickel-plated steel strip burns through in seconds (creator: cells picked up from a live stream, 2C is as good as it gets); does drawing power straight off the pack without going through the BMS matter (creator: discharge doesn’t go through the board); copper strip thickness and cell C-rate are both too low, too dangerous; where to buy the welder (shop window); leave a watermark to stop reposts; part 3 tests capacity.

Outcome

GoalJump starter, part 2: wire the BMS / balance board and main leads, fit into the shell
Build3P4S pack + 4S BMS + balance board + speaker-shell panel
ResultPanel shows full, USB / Type-C charging works, fitted into the shell · verified on camera: 109–151s panel display, USB charging at 29%, Type-C charging normal

Steps7 steps · click a frame to jump

  1. 1. Three layers of tabs welded, almost no charge used

    Welded rock-solid; the whole pack is done, with three layers of tabs, very solid; the charge has barely dropped, should be good for a lot of packs.

    00:01 – 00:29
  2. 2. Wire the BMS: main + / +1 / +2 / +4 / main −, extend the leads

    Lead positions for main +, +1, +2, +4 and main −; the leads are a bit short, so extend them.

    00:30 – 00:56
  3. 3. Red / yellow sleeves, foam pads, trim sharp edges, fix before wiring

    Red sleeve on the main +, yellow on the others; foam pads for a first fix; trim sharp protrusions; get it basically fixed before wiring, otherwise it’s hard to secure afterwards.

    01:07 – 01:37
  4. 4. BMS + balance board wired, charging at 14.5V

    Main +, +1... and finally main − connected; BMS and balance board done; 14.5V, can charge from a low-voltage supply.

    01:38 – 02:03
  5. 5. Panel test: full, lamp on, USB slow charge, Type-C fine

    Press the switch and it shows full, long-press and the lamp is quite bright; USB charges a phone at 29%, works but a very slow trickle; Type-C charging normal, the last lamp blinking means not quite full.

    02:03 – 02:31
  6. 6. Thicker wire for main + and −

    The main + / − ‘thick’ leads aren’t really thick; swap for wire a good size up from stock.

    02:31 – 02:54
  7. 7. Bundle and insulate with electrical tape, into the shell, extra insulation on the main +

    Main leads connected and tidied; no heat-shrink, so bundle with electrical tape, two turns over each contact; bundled tight; fits back in the original shell exactly; extra insulation on the main + against shorts; next step is the mod.

    03:01 – 03:36

Bill of materials

3P4S pack (previous episode) ×1Main body
4S BMS + balance board ×1Charge protection and balancing
Red / yellow sleeves, foam padsMarking and fixing
Thick wire (main + / −)A size up from stock · High current
Electrical tapeInsulation and bundling
Speaker-shell panel (switch / lamp / USB / Type-C) ×1Shell functions

Measured on camera

Voltage after wiring the board14.5 V 01:49
Phone charge level while charging29 % 02:03

Creator’s tips

  • Fix the pack first, then wire it, otherwise it’s hard to secure afterwards 01:27
  • Red sleeve on the main +, yellow on the rest, for easy identification 01:07
  • Trim sharp protrusions so they can’t pierce the insulation 01:20
  • Extra insulation at the main + to prevent shorts 03:23

Pitfalls

  • BMS leads are short and need extending; the stock main leads aren’t thick enough 00:41
  • The USB output is a very slow trickle charge 02:03
  • Comments: 3P 18650 gives 60–90A at most, starting needs 200–600A, nickel-plated steel strip will burn through; discharge doesn’t go through the BMS

Li-ion safety

  • Discharge is taken straight off the pack, bypassing the BMS; at starting currents the nickel strip / cell C-rate is insufficient and may burn out (comments; the creator admits the cells are only 2C)
  • Comments: beginners, remember to wear gloves
DIY lithium packs can catch fire: check cells for shorts before welding, always add a BMS, never skip insulation and fusing on high-current builds.

Quotes

“Look, it’s barely used any charge — I reckon if you’re welding cells like these it can do a whole lot of packs” 00:16

Comments 68· 14 real comments collected

Comment insightsanswered 3 · open 1 · corrections 3

Answered by the creator

Where to buy the spot welder
It's in my showcase (creator)
How can this board both charge and discharge?
Discharge bypasses the board (creator)
Where's episode 3
Testing capacity, charging (creator)

Open questions

Does taking power directly, bypassing the BMS, cause any problems 1

Corrections from viewers

A car start needs 200–600A; 3P 18650 gives 60–90A at most, and if the current were enough the nickel-plated steel strip would burn through in secondsValid
Starting a car with this is too dangerous, copper strip too thin and cell C rating too low, one or two jumps and it's doneValid
Watermark your own videos so they don't get reposted 2Valid
Starting current / safetyDischarge bypasses the boardOne-piece welding penRepost watermarkEpisode 3
此
此数大吉8 mo ago · Beijing

Where did you buy the spot welder

重
重生之末日实验室8 mo ago · Heilongjiang

It's in my showcase

像
像狗一样奔跑1 yr ago · Shandong

Starting a car takes roughly 200–600A. Your 3P 18650s, even if they're power cells, give 60–90A at most. Not enough current and it's got no punch; enough current and your nickel-plated steel strip burns through in seconds

重
重生之末日实验室1 yr ago · Heilongjiang

The cells I grabbed from the livestream can't get there, hitting 2C would already be great

在
在哪1 yr ago · Jiangsu

Starting a car with this is way too dangerous, copper strip too thin, cell C rating too low, I bet it's done after one or two jumps

圆
圆1 yr ago · Guangdong

This takes power directly without going through the BMS, does that cause any problems, with the BMS used for charging

千
千总5 mo ago · Guangdong

How does this board manage to both charge and output? What board is it, got a link? ^_^

重
重生之末日实验室5 mo ago · Heilongjiang

Discharge bypasses the board

l
linlin1 yr ago · Yunnan

Always watermark your own videos, or anyone can repost them as their own

重
重生之末日实验室1 yr ago · Heilongjiang

Lots of reposts already, no big deal, just sharing this bit of knowledge

像
像狗一样奔跑1 yr ago · Shandong

My two crappy pens are a bit lacking, I want to work out a one-piece pen, otherwise there's no hand free to hold the strip

像
像狗一样奔跑1 yr ago · Shandong

Abandoned? Where's episode 3? Did you eat it???

重
重生之末日实验室1 yr ago · Heilongjiang

Testing capacity, charging

懒
懒人寻味7 mo ago · Fujian

Beginners, remember to wear gloves, seriously

l
linlin1 yr ago · Yunnan

Always watermark your own videos, or anyone can repost them as their own

重
重生之末日实验室1 yr ago · Heilongjiang

Lots of reposts already, no big deal, just sharing this bit of knowledge

圆
圆1 yr ago · Guangdong

This takes power directly without going through the BMS, does that cause any problems, with the BMS used for charging

此
此数大吉8 mo ago · Beijing

Where did you buy the spot welder

重
重生之末日实验室8 mo ago · Heilongjiang

It's in my showcase

像
像狗一样奔跑1 yr ago · Shandong

Starting a car takes roughly 200–600A. Your 3P 18650s, even if they're power cells, give 60–90A at most. Not enough current and it's got no punch; enough current and your nickel-plated steel strip burns through in seconds

重
重生之末日实验室1 yr ago · Heilongjiang

The cells I grabbed from the livestream can't get there, hitting 2C would already be great

在
在哪1 yr ago · Jiangsu

Starting a car with this is way too dangerous, copper strip too thin, cell C rating too low, I bet it's done after one or two jumps

千
千总5 mo ago · Guangdong

How does this board manage to both charge and output? What board is it, got a link? ^_^

重
重生之末日实验室5 mo ago · Heilongjiang

Discharge bypasses the board

像
像狗一样奔跑1 yr ago · Shandong

My two crappy pens are a bit lacking, I want to work out a one-piece pen, otherwise there's no hand free to hold the strip

像
像狗一样奔跑1 yr ago · Shandong

Abandoned? Where's episode 3? Did you eat it???

重
重生之末日实验室1 yr ago · Heilongjiang

Testing capacity, charging

懒
懒人寻味7 mo ago · Fujian

Beginners, remember to wear gloves, seriously

此
此数大吉8 mo ago · Beijing

Where did you buy the spot welder

重
重生之末日实验室8 mo ago · Heilongjiang

It's in my showcase

像
像狗一样奔跑1 yr ago · Shandong

Starting a car takes roughly 200–600A. Your 3P 18650s, even if they're power cells, give 60–90A at most. Not enough current and it's got no punch; enough current and your nickel-plated steel strip burns through in seconds

重
重生之末日实验室1 yr ago · Heilongjiang

The cells I grabbed from the livestream can't get there, hitting 2C would already be great

在
在哪1 yr ago · Jiangsu

Starting a car with this is way too dangerous, copper strip too thin, cell C rating too low, I bet it's done after one or two jumps

圆
圆1 yr ago · Guangdong

This takes power directly without going through the BMS, does that cause any problems, with the BMS used for charging

千
千总5 mo ago · Guangdong

How does this board manage to both charge and output? What board is it, got a link? ^_^

重
重生之末日实验室5 mo ago · Heilongjiang

Discharge bypasses the board

l
linlin1 yr ago · Yunnan

Always watermark your own videos, or anyone can repost them as their own

重
重生之末日实验室1 yr ago · Heilongjiang

Lots of reposts already, no big deal, just sharing this bit of knowledge

像
像狗一样奔跑1 yr ago · Shandong

My two crappy pens are a bit lacking, I want to work out a one-piece pen, otherwise there's no hand free to hold the strip

像
像狗一样奔跑1 yr ago · Shandong

Abandoned? Where's episode 3? Did you eat it???

重
重生之末日实验室1 yr ago · Heilongjiang

Testing capacity, charging

懒
懒人寻味7 mo ago · Fujian

Beginners, remember to wear gloves, seriously

Show 6 more comments