
Ep. 37 | A high-capacity power bank this easy? Build one at home for ¥20-odd — a huge-capacity, honestly rated power bank worth ¥100+

Creator’s own settings as stated in the video (timestamps link to the moment). Not official values — test on scrap first.
Bill of materials
Welder, accessories, consumables and parts used in this build; quantities and specs are editable Download BOMDescription
A ¥20–30 DIY fast-charge power bank with an honest rating: 8 × 2000mAh 18650 all in parallel for 16000mAh + a ¥10-ish boost fast-charge module + a PVC-sheet case
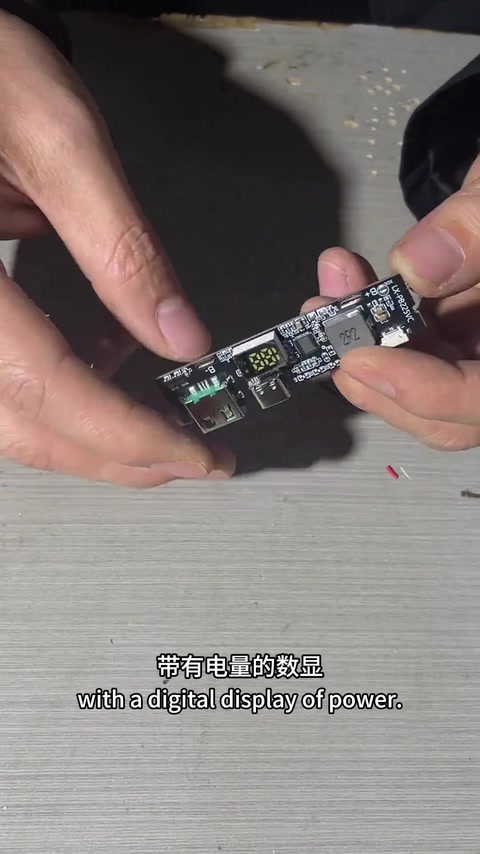
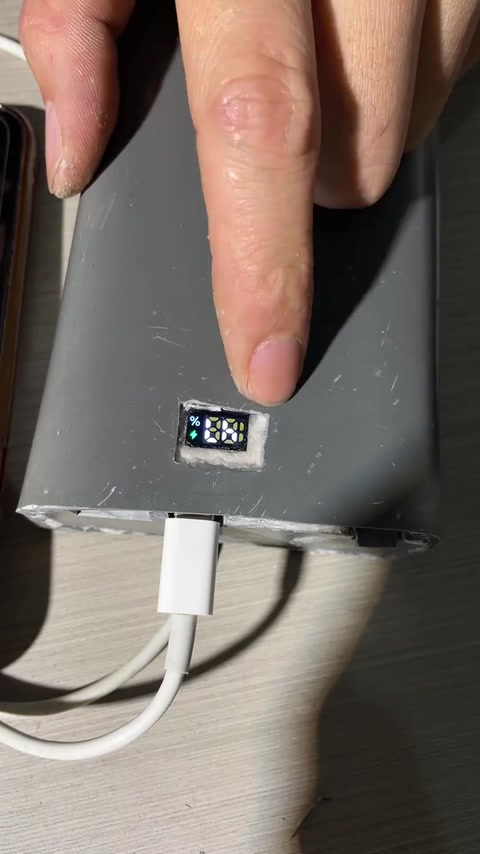
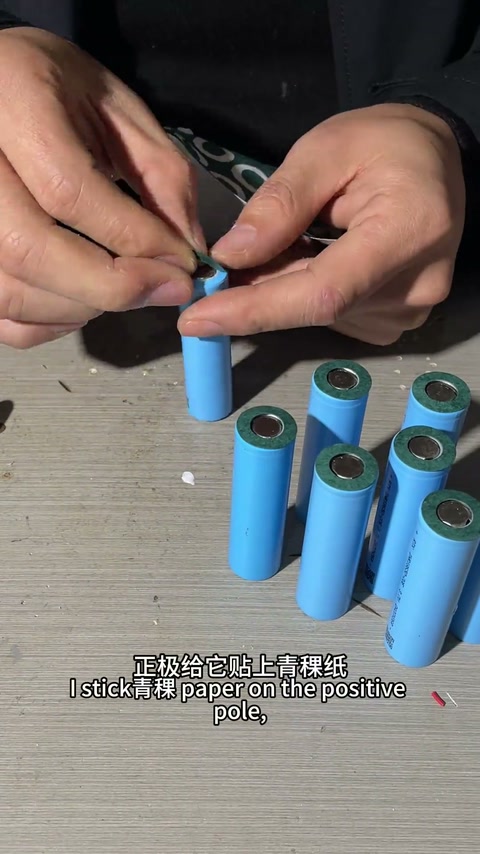
The heart of it is a power-bank boost module with a digital charge readout and fast-charge protocol support (about ¥10), paired with 8 × 18650 (¥2–3 each). Test the cells’ internal resistance, stick fish paper on the positive ends, load them into a single-row holder and wire everything in parallel (the module is a boost type, so it only needs 3.7–4.2V); 8 × 2000mAh = 16000mAh. Wrap in fish paper, spot-weld, insulate the positive and negative ends again with fish paper, measure 3.6–3.7V, solder leads onto the positive and negative pads and wrap the joints with filament tape. Two wires go to the module; press the switch and it shows the charge level. The case is hand-cut from PVC sheet (a 3D printer would look nicer), openings cut with a home-made fret saw and a small electric saw, glued with strong adhesive, with cut-outs for the display, the USB / Type-C ports and a small button. The Type-C port does input and output; with a powerful enough charger it goes into fast charge (green lightning icon), the USB port also fast-charges, and it will keep a phone going for two or three days.
Outcome
| Goal | Build a high-capacity, honestly rated, fast-charging power bank at home for ¥20–30 |
| Build | 1S8P 18650 16000mAh + power-bank boost module + PVC case |
| Result | Finished; fast-charge mode demonstrated · verified on camera: 176–195s, connected to a phone, the green lightning fast-charge icon shows |
Steps8 steps · click a frame to jump
 1. The two big parts: power-bank module + 8 × 18650
The module is about ¥10 online, with a digital charge readout and fast-charge support; the 8 × 18650 are about ¥2–3 each; test internal resistance first.
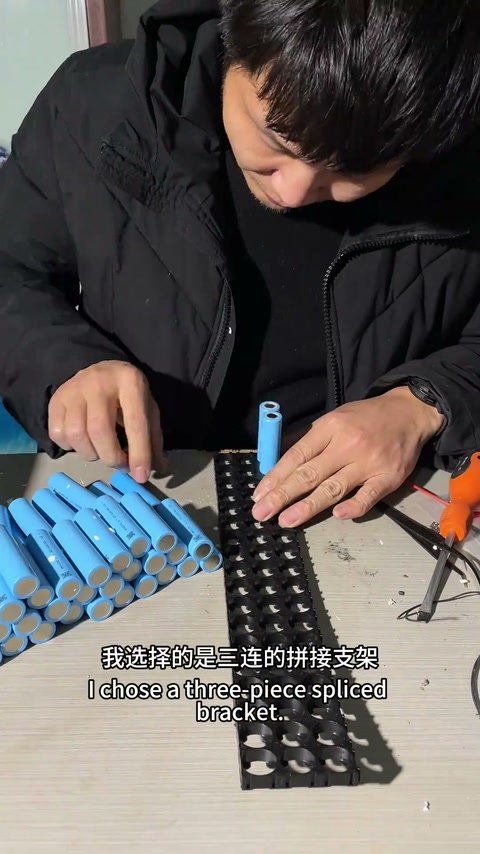
00:00 – 00:27 2. Fish paper on the positive ends, into the holder, all in parallel
As usual, fish paper on the positive ends; fill a single-row holder; everything in parallel — the module is a boost type, so 3.7 or 4.2V is enough.
00:20 – 00:41 3. Capacity math: 8 × 2000 = 16000mAh
Parallel adds capacity; 2000mAh each, 8 cells = 16000mAh, which looks like a 20–30 thousand mAh power bank; a commercial one with pouch cells would be smaller.
00:41 – 00:54 4. After spot-welding, insulate the poles with fish paper, measure voltage, solder leads
A power bank is carried around, so insulate carefully to avoid shorts; measures 3.6–3.7V; solder wires onto the positive and negative pads and wrap the joints in filament tape so they can’t pull off.
00:54 – 01:21 5. Two wires to the module, press the switch to see the charge level
Only two wires — just don’t swap positive and negative; press the switch and it shows the remaining charge.
01:21 – 01:35 6. PVC sheet for the case
A 3D printer would look nicer; cut the end caps with a home-made fret saw and fix with strong glue; the lid is just one cut piece.
01:35 – 02:14 7. Cut the display and USB / Type-C openings, fit the module and button
Cut the display opening with a home-made mini electric saw; cut the USB and Type-C port positions and fix the module; make a small button from scrap plus glue; fix the pack into the box, tidy the wires, run glue along the edge and close the lid.
02:14 – 02:56 8. Fast-charge check
Charge with an ordinary Type-C cable; with a powerful enough charger it goes into fast charge; the Type-C port does input and output; connected to a phone, the green lightning icon means fast charge is active; the USB port fast-charges too; enough to charge a phone for two or three days out and about.
02:56 – 03:22
Bill of materials
| Power-bank boost module ×1 | Digital readout, fast-charge protocols, about ¥10 · Core part |
| 18650 cells ×8 cells | 2000mAh, ¥2–3 each · Battery pack |
| Single-row cell holder ×1 | Holds the cells |
| Fish paper | Insulating the positive end / both poles |
| Filament tape | Securing the wire ends |
| PVC sheet | Case |
| Home-made fret saw / mini electric saw | Cutting the sheet and openings |
| Strong glue | Gluing the case |
| DT9205A multimeter ×1 | Measuring internal resistance / voltage |
Measured on camera
| Pack voltage | 3.6–3.7 V 01:10 |
Creator’s tips
- The module is a boost type, so with all cells in parallel you only need 3.7–4.2V; parallel adds capacity 00:35
- Only two wires to connect — just don’t swap positive and negative 01:35
- The case is up to you; it looks nicer if you can do woodwork or have a 3D printer 01:43
Pitfalls
- It looks like a 20–30 thousand mAh power bank but is really 16000mAh (commercial ones use pouch cells and are smaller) 00:48
Li-ion safety
- A power bank is carried on you, so insulate the poles and the whole pack carefully; keep Li-ion cells well away from any short 00:58
Quotes
Cost & time
| Power bank module | ¥About ¥10 |
| 18650 ×8 | ¥¥2–3 each |
| Total | 20–30 |
Ideas for you
 Pinned07:55Rural Abiao39.9k28360
 03:22Rural Abiao6372783007:55Rural Abiao39.9k283617.0k
Comment insightsanswered 0 · open 1 · corrections 2
Open questions
Corrections from viewers
Bro, yours is outdated. Come on, I'll teach you a faster way. Buy a lithium battery pack online, then buy an e-bike charger converter, ¥2–3 each, or ¥4–5 each. Just two wires, simple and done, right? Most importantly this thing stores a lot of power, zero tech involved, it's a foolproof job.
Reply @小小鱼尾巴游:
Bro, yours is outdated. Come on, I'll teach you a faster way. Buy a lithium battery pack online, then buy an e-bike charger converter, ¥2–3 each, or ¥4–5 each. Just two wires, simple and done, right? Most importantly this thing stores a lot of power, zero tech involved, it's a foolproof job.
Reply @小小鱼尾巴游:
Bro, yours is outdated. Come on, I'll teach you a faster way. Buy a lithium battery pack online, then buy an e-bike charger converter, ¥2–3 each, or ¥4–5 each. Just two wires, simple and done, right? Most importantly this thing stores a lot of power, zero tech involved, it's a foolproof job.
Reply @小小鱼尾巴游: